
Bihar’s Traditional Sweet Delight
Ingredients for Thekua (Serves 4–5)
Main Ingredients
- Whole wheat flour (atta) – 2 cups
- Jaggery (gur) – 1 cup (grated or chopped finely)
- Ghee (clarified butter) – 4 tablespoons (for mixing)
- Water – ½ cup (for jaggery syrup)
- Oil or ghee – for deep frying
Flavor Enhancers
- Fennel seeds (saunf) – 1 teaspoon
- Cardamom powder (elaichi) – ½ teaspoon
- Grated dry coconut – 2 tablespoons
- Chopped dry fruits (optional) – 2 tablespoons (cashew, almond, or raisin)
Optional Additions
- A few drops of rose water (for fragrance)
- 1 mashed banana (for a softer texture)
- A pinch of black pepper powder (for an earthy note)
Step-by-Step Thekua Recipe
Let’s now go through each stage in detail.
Step 1: Preparing the Jaggery Syrup
- Take a small saucepan and add the grated jaggery along with ½ cup of water.
- Place it on low heat and stir gently until the jaggery melts completely.
- Avoid boiling it too much — you just need the jaggery to dissolve.
- Once melted, strain the syrup using a fine sieve to remove impurities.
- Set the syrup aside to cool down slightly. It should be warm, not hot, when you use it later.
Tip:
If your jaggery is of good quality (clean and chemical-free), you can skip the straining step. However, straining is safer for a smooth dough texture.
Step 2: Mixing the Dry Ingredients
- In a large mixing bowl, add 2 cups of whole wheat flour.
- Add fennel seeds, grated coconut, and cardamom powder.
- Mix them thoroughly with your hands to ensure the flavors are distributed evenly.
Optional Add-ins:
At this stage, you can also add chopped dry fruits, sesame seeds, or a pinch of nutmeg for added flavor and crunch.
Step 3: Adding Ghee – “Moyen Dena”
- Pour 4 tablespoons of melted ghee into the dry mixture.
- Using your fingertips, rub the ghee into the flour gently.
- Continue until the mixture looks crumbly — similar to coarse sand.
This process, known as “moyen dena” in Hindi, is crucial for thekua. It helps create that perfect crisp texture after frying. To check if the moyen is enough, take a small amount of the mixture and press it in your palm — if it holds its shape, it’s ready.
Step 4: Making the Dough
- Gradually add the lukewarm jaggery syrup into the flour mixture.
- Mix with your hand or a spoon. Add a little syrup at a time to avoid making the dough sticky.
- Knead gently until you form a stiff but pliable dough.
- The dough should not be too soft (like chapati dough) — it must be firm enough to hold shape when fried.
Tip:
If the dough feels dry, add a teaspoon of water or milk. If it’s too sticky, sprinkle a little flour. The right consistency is the key to good thekua.
Step 5: Shaping the Thekua
Now comes the fun part — shaping!
- Divide the dough into small lemon-sized balls.
- Flatten each ball slightly between your palms to form a round disc.
- Traditionally, people use wooden molds (saanchas) to press designs onto the discs.
- If you don’t have a mold, use a fork or knife to make simple patterns on top.
These designs not only make thekua look beautiful but also help it fry evenly by allowing oil to penetrate the dough.
Pro Tip:
Avoid making the discs too thick — about ½ inch is ideal. Thicker ones may remain raw inside.
Step 6: Frying the Thekua
- Heat oil or ghee in a deep pan or kadhai over medium heat.
- To test the temperature, drop a small piece of dough — it should rise to the surface slowly without burning.
- Carefully slide 3–4 shaped thekuas into the oil.
- Fry on low to medium flame, turning occasionally, until both sides turn golden brown.
Important:
Frying too fast will make the outside brown while the inside stays raw. Slow frying ensures even cooking and gives thekua its lovely crisp crust and soft core.
- Once done, remove the thekuas using a slotted spoon and drain them on paper towels.
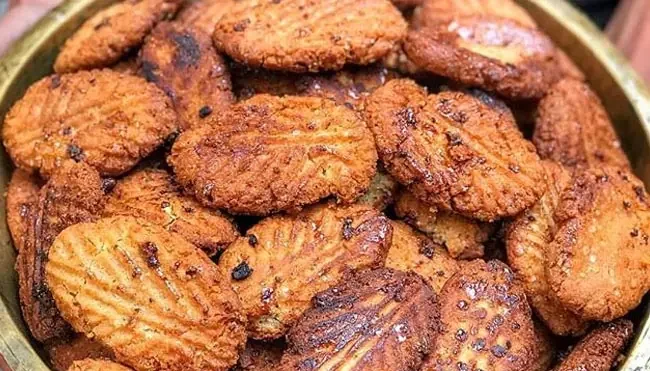
Visual cue:
Perfectly fried thekua will have a rich golden color and a slight sheen of ghee.
Step 7: Cooling and Storing
- Let the thekuas cool completely on a wire rack or tray.
- Once cooled, they will firm up and become crispier.
- Store in an airtight steel or glass container.
They stay fresh for 10–12 days at room temperature. No need to refrigerate!
Serving
- Enjoy Thekua warm with a cup of chai or milk.
- They also make a perfect travel snack — easy to pack and non-sticky.
- During Chhath Puja, they are offered to the Sun God and then distributed as prasad among family and neighbors.
Tips for Perfect Thekua
- Right Dough Texture:
The dough should be stiff. If it’s soft, the thekua will absorb too much oil. - Jaggery vs. Sugar:
Jaggery gives a deep caramel flavor, while sugar makes them lighter in color and slightly crisper. - Frying Temperature:
Medium-low flame is best. Too hot, and they’ll burn outside but remain uncooked inside. - Ghee Quality:
Always use fresh, pure ghee. The aroma makes a big difference in flavor. - Healthy Alternative:
You can bake thekua at 180°C (350°F) for about 15–20 minutes, flipping halfway for even browning.
Variations of Thekua
- Banana Thekua:
Add one ripe mashed banana to the dough. It gives a moist, soft texture and subtle sweetness. - Coconut Thekua:
Add ¼ cup of grated fresh coconut for a chewy, tropical version. - Dry Fruit Thekua:
Mix in chopped cashews, almonds, and raisins for extra crunch. - Spiced Thekua:
Add a pinch of cinnamon or black pepper for a spicy twist. - Baked Thekua:
For a modern touch, bake instead of frying — healthier yet delicious.