
A Simple, Home-Style Guide
Ingredients for Sarson da Saag
Greens:
- Mustard leaves (sarson) – 500 g
- Bathua leaves – 250 g (optional but very traditional and recommended)
- Spinach (palak) – 250 g
- A small handful of methi leaves (optional)
Other ingredients:
- 1 onion, chopped
- 6–7 garlic cloves
- 1 inch ginger
- 2–3 green chillies
- 2 tomatoes, chopped
- 2–3 tablespoons makki atta (maize flour)
- 1 teaspoon red chilli powder
- ½ teaspoon turmeric
- 1 teaspoon cumin seeds
- 3–4 tablespoons ghee
- Salt to taste
- Water as needed
How to Make Sarson da Saag – A Very Human Step-by-Step Guide
1. Cleaning the greens (an important step most people rush)
Greens often carry mud, sand, and grit, especially sarson. So don’t rush this step. Rinse them in a big bowl of water, drain, then rinse again. You’ll probably need to repeat this two or three times. Only when the water runs clear should you start chopping.
Wash patiently — your final saag will taste cleaner and fresher.
Once washed, roughly chop the leaves. They don’t need to be perfect; they’ll soften while cooking.
2. Cook the greens gently
Take a large pot. Add:
- all the chopped greens
- tomatoes
- green chillies
- ginger
- garlic
- a pinch of salt
- and around 2 cups of water
You don’t need a lot of spices here — the greens themselves are the hero of the dish.
If you’re cooking traditionally, keep the flame low and allow the greens to simmer. Let them soften slowly for 1 to 1½ hours. This slow cooking brings out a richer flavor.
If you want to save time, the pressure cooker gives you a shortcut — 3 or 4 whistles. But if you have the time, choose the slow approach. It’s worth the wait.
3. Mash the greens
Once the greens are soft, they need to be mashed. Traditionally, folks use a mathni (a wooden whisk-like tool). If you don’t have one, a simple potato masher does the job.
Mash until the greens break down into a coarse, thick mixture. Don’t try to make it smooth like a puree. Saag should have texture — that’s what makes it hearty and satisfying.
If you want it slightly smoother, pulse it once or twice in a blender, but don’t overdo it. If you blend too much, it loses its rustic character and becomes spinach soup.
4. Add makki atta to thicken
Mix 2–3 tablespoons of makki atta with a little water to make a slurry. Add this slowly to the saag while stirring.
This flour does two things:
- It thickens the saag.
- It gives it that earthy, unmistakable Punjabi flavor.
Let the saag simmer for another 20–25 minutes on low. Stir occasionally. By now, your kitchen will smell incredible.
5. Prepare a beautiful tadka
The tadka (tempering) transforms the saag from “nice” to “wow.”
In a small pan:
- Heat 3 tablespoons of ghee.
- Add cumin seeds and let them crackle.
- Add chopped onions and sauté till golden.
- Add garlic and cook until slightly brown.
- Stir in red chilli powder and turmeric.
The aroma at this point is magical. Pour this sizzling tadka straight into the saag. The sound, the smell, everything about this moment feels homely and comforting.
Mix well and allow the saag to simmer for 10 more minutes.
6. Final touches
Taste the saag. Adjust the salt. If you want a richer flavor (and trust me, you do), add one more spoon of ghee on top.
Your sarson da saag is ready.
Ingredients for Makke di Roti
- 2 cups makki atta (cornmeal flour)
- Warm water (not hot)
- ½ teaspoon salt
- Ghee for cooking
How to Make Makke di Roti (the human way)
Cornmeal is tricky because it doesn’t contain gluten. That means the dough doesn’t stretch and hold together like wheat flour. But don’t worry — with warm water and gentle handling, anyone can do it.
1. Make the dough
Add salt to the makki atta. Pour warm water little by little and start bringing it together. Use your fingers; don’t try to knead it like wheat dough. Simply press it gently to form a soft dough.
If it crumbles, add a little more water. If it’s sticky, sprinkle a bit more flour.
The dough won’t be elastic — that’s normal.
2. Shape the rotis
This is the tricky part. Here are three methods:
Traditional method (for experienced cooks)
Take a small dough ball, flatten it between your palms, and slowly press it outwards until it forms a round disc.
Easy method (for everyone)
Place the dough ball between two pieces of plastic sheet or parchment paper and gently roll it out with a rolling pin.
Most reliable method
Use your fingers to press the dough into a round shape directly on a sheet of paper, then flip it onto the hot pan.
3. Cook the roti
Heat a tawa on medium flame. Gently place the roti on it. Let it cook on one side. Once you see small brown spots, flip it.
Brush a little ghee on both sides as it cooks. Corn rotis become delightfully crisp on the outside and soft inside if cooked patiently.
If your roti breaks, don’t worry — it happens to everyone, even experts. Makki rotis are like that. The more you make them, the better they get.
4. Keep them soft
Makke di roti tends to dry out quickly. Wrap them in a cloth or keep them in a closed container right after cooking.
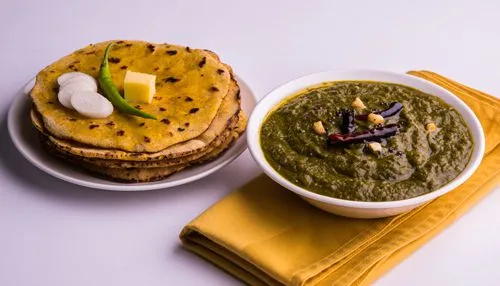
How to Serve the Classic Punjabi Meal
The best way to enjoy this dish is simple:
- A big spoonful of steaming sarson da saag
- A hot makki roti smeared with ghee
- A little white butter on top of the saag
- A piece of jaggery
- A glass of chaas (buttermilk)
This combination is warm, wholesome, and soothing — especially in winter. The bitterness of mustard greens, the earthy sweetness of cornmeal, the creaminess of ghee, and the freshness of buttermilk create an unforgettable meal.
Tips Only Experienced Cooks Will Tell You
- Add bathua if possible — it gives the best texture.
- Don’t skip ghee; it’s essential, not optional.
- Don’t blend the saag smooth — you’ll lose authenticity.
- Slow cooking always tastes better.
- Makki rotis need patience. Don’t rush.
- Serve immediately for the best experience.