
The Slow-Cooked Sweet That Feels Like Home
In every Indian mithai shop, among rows of colorful laddoos, glossy jalebis, and creamy barfis, there’s always one sweet that looks humble but stands out for its unique texture and taste—the Milk Cake. Slightly brown in the middle, pale on the edges, grainy in texture, and bursting with caramelized flavor, milk cake is one of those sweets that reminds you of festivals, weddings, or even the small boxes of mithai brought home by relatives.
Unlike barfi, which is smooth and uniform, milk cake has an old-world charm. It is rustic, dense, and unpretentious—yet deeply satisfying. Made from just a handful of ingredients—milk, sugar, ghee, and a hint of acidity—it is the perfect example of how patience and simplicity can create magic.
In this recipe, I’ll take you through the journey of milk cake: its story, the ingredients you’ll need, the process of making it step by step, and little tips that will help you get it right. Along the way, we’ll also explore variations and why this sweet has stayed close to Indian hearts for generations.
The Story and Significance of Milk Cake
Milk Cake, also known as Alwar ka mawa in Rajasthan, has a rich legacy. The town of Alwar is famous for producing some of the finest milk cakes in India. Local sweet makers perfected the art of slow-cooking milk until it caramelized slightly, creating that signature brownish center. For decades, people traveling through Rajasthan would stop by just to buy a box of Alwar milk cake as a souvenir.
Beyond Rajasthan, milk cake became a festive staple across India. Whether it’s Diwali, Raksha Bandhan, or family weddings, trays of milk cake are gifted and shared. Unlike lighter sweets, milk cake feels hearty and indulgent—it fills you with warmth, much like kheer or rabri. And that’s probably why it has survived through centuries, even when newer, fancier sweets entered the scene.
What Makes Milk Cake Special?
Milk cake is different from other milk-based sweets because of two things:
- Texture – It’s not smooth like barfi. Instead, it has a crumbly, grainy bite created by curdling milk lightly during cooking.
- Caramelization – Unlike kalakand, milk cake is left to set slowly in its own heat, which creates a natural brown center. This unique two-tone effect makes each piece look handmade and rustic.
Every bite is a combination of soft creaminess and earthy caramel notes—something that instantly makes you close your eyes and savor it.
Ingredients for Milk Cake
The beauty of milk cake is its simplicity. You don’t need exotic flavors or complicated techniques—just quality ingredients and patience.
You’ll need:
- 2 liters full-fat milk – the base of the sweet; always choose fresh, creamy milk.
- 1 cup sugar – adjust according to taste.
- 3 tablespoons ghee (clarified butter) – adds richness and prevents sticking.
- 1 tablespoon lemon juice or vinegar – added in tiny amounts to create a grainy texture.
- ½ teaspoon cardamom powder – for fragrance.
- Chopped nuts (optional) – pistachios, almonds, or cashews for garnish.
Step-by-Step Method
Making milk cake takes time, but the process itself is almost meditative. If you enjoy slow cooking, you’ll love the rhythm of this recipe.
Step 1: Boil and Reduce the Milk
Start with a heavy-bottomed kadhai or pan—this is essential because milk burns easily. Pour in the 2 liters of full-fat milk and bring it to a boil. Once it boils, reduce the flame and let it simmer.
Keep stirring every few minutes. The milk will start reducing, thickening, and coating the spoon. This stage may take 30–40 minutes, but it’s worth it. The slower the milk reduces, the better the flavor.
💡 Tip: Always stir in circular motions, scraping the sides, so no milk solids stick and burn.
Step 2: Add Acidity to Create Texture
When the milk has reduced to about one-third of its original volume, add a few drops of lemon juice. The milk should not curdle completely (like paneer); it should just develop small granules. Stir gently—you’ll see a grainy texture forming. This is the signature of milk cake.
Step 3: Sweeten It
Once the granules form, add sugar. As the sugar melts, the mixture will loosen a bit and turn glossy. Keep stirring, and soon it will thicken again.
Add ghee at this stage. The ghee not only adds richness but also prevents the mixture from sticking to the pan. The aroma at this point is heavenly—caramelizing milk and sugar filling the kitchen.
Step 4: Flavor and Set
Sprinkle in cardamom powder for fragrance. Grease a steel plate or tin with ghee and pour the mixture into it.
Here’s the interesting part—don’t spread it flat. Just pour it in and let it settle naturally. Cover the tin with a lid or foil and leave it undisturbed for 5–6 hours, or overnight.
During this resting period, the milk cake sets slowly in its own heat. The top and bottom remain creamy white, while the center develops that deep, caramel-brown color that milk cake is famous for.
Step 5: Slice and Serve
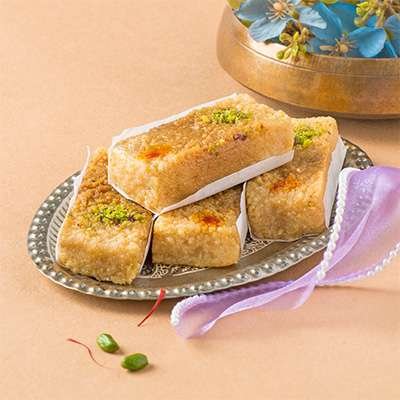
Once fully set, cut into squares or rectangles. You’ll notice the unique two-tone effect—the middle brownish, the sides lighter. That rustic look is exactly what makes milk cake different from barfi. Garnish with nuts if you like.
Serving Suggestions
Milk cake is rich and dense, so small portions are perfect. Serve it during festive gatherings with masala chai, or place it on a mithai platter alongside gulab jamun and laddoo. It also makes a wonderful edible gift—packed neatly in small boxes wrapped with festive ribbon.
Variations of Milk Cake
Though the traditional version is unbeatable, people often experiment with flavors:
- Jaggery Milk Cake: Replace sugar with jaggery for a more earthy taste.
- Dry Fruit Milk Cake: Add chopped dry fruits like almonds, pistachios, and cashews for crunch.
- Saffron Milk Cake: Infuse the milk with saffron strands for a golden hue and royal aroma.
- Chocolate Milk Cake: A modern twist—add cocoa powder or melted chocolate for kids.
Tips for Perfect Milk Cake
- Patience is key – slow cooking brings out the best flavors.
- Don’t over-curdle – add lemon juice drop by drop. Too much will turn it into paneer.
- Use full-fat milk – toned milk won’t give richness.
- Heavy pan is essential – thin pans cause burning.
- Resting time – don’t rush cutting. Let it sit overnight for the best color and texture.
Why Milk Cake Feels Special
Every sweet in India has its own story. Jalebi is about celebration, rasgulla about lightness, gulab jamun about indulgence—but milk cake is about patience, simplicity, and home.
It doesn’t need silver leaves, food coloring, or elaborate garnishing. It’s just milk, slowly transformed into something extraordinary. Perhaps that’s why milk cake always feels authentic—it reminds us that sometimes the most beautiful things are created with time and love.
For many, milk cake brings back childhood memories: waiting for festive boxes to be opened, sneaking in the kitchen to cut a small piece, or watching elders slowly stir milk on the stove while telling stories. Even today, when we buy fancy desserts, a small square of milk cake still manages to steal the spotlight.
Final Thoughts
Milk cake is proof that simplicity never goes out of style. With just four main ingredients, a little patience, and a lot of love, you can create a sweet that feels festive, homely, and timeless.
So the next time you’re planning a celebration—or even just craving something indulgent—try making milk cake at home. As you stir the milk, watch it transform, and finally slice into that caramel-colored center, you’ll realize that cooking is as much about the journey as it is about the taste.
Serve it with pride, share it with loved ones, and carry forward the tradition of this age-old Indian mithai.