
Kheer Recipe: A Comforting Indian Rice Pudding
There’s something incredibly comforting about a bowl of homemade kheer. It’s creamy, subtly sweet, infused with the warmth of cardamom, and often topped with golden nuts and plump raisins. For many Indian households, kheer isn’t just a dessert—it’s an emotion. It’s served at festivals, birthdays, after poojas, and sometimes, just as a sweet ending to a simple Sunday meal.
Kheer has a timeless, humble charm. It doesn’t require fancy ingredients or complicated techniques. In fact, if you have milk, rice, and sugar, you’re already halfway there. The rest is all about patience and love. That slow simmer, the gentle stirring, and watching the milk thicken—it’s almost therapeutic.
In this recipe, I’ll walk you through the traditional way of making rice kheer, step-by-step, along with little tips and tricks I’ve picked up over the years to make it extra creamy and delicious. Whether you’re making it for the first time or the fiftieth, this version will feel like a warm hug in a bowl.
Ingredients You’ll Need:
Let’s start with the basics. These are the ingredients you’ll need to make a classic North Indian-style kheer. This will serve around 4–6 people.
- Basmati rice – 1/4 cup (around 50 grams), washed and soaked for 30 minutes
- Full-fat milk – 1 litre (this gives the creamiest texture)
- Sugar – 1/4 cup or 4–5 tablespoons (adjust according to your taste)
- Green cardamom pods – 4 to 5, lightly crushed (or 1/2 teaspoon cardamom powder)
- Chopped nuts – a small handful (cashews, almonds, pistachios—choose your favorites)
- Raisins – 1 tablespoon (optional, but they plump up beautifully in the kheer)
- Saffron strands – 7–8 strands (optional, adds fragrance and color)
- Ghee (clarified butter) – 1 tablespoon (optional, for frying nuts and raisins)
Preparation Time:
- Soaking Time: 30 minutes
- Cooking Time: 45–60 minutes
- Total Time: About 1.5 hours
Step-by-Step Method
1. Soak the Rice
Start by rinsing the basmati rice a couple of times in water to remove excess starch. Then soak it in water for at least 30 minutes. This step helps the rice cook faster and break down nicely in the milk, making the kheer extra creamy.
Tip: Use basmati rice if you can. It adds a subtle fragrance that pairs beautifully with the other flavors.
2. Boil the Milk
Pour the full-fat milk into a thick-bottomed pan or kadai. A heavy pan helps prevent the milk from sticking and burning. Place the pan on medium-high heat and bring the milk to a boil, stirring occasionally.
Once it starts to boil, reduce the flame to low. Let the milk simmer gently. Stir every few minutes so that it doesn’t stick to the bottom or form a thick layer on top.
Tip: If you’re using saffron, soak the strands in a tablespoon of warm milk at this stage and set aside. You’ll add this later.
3. Add the Rice
Drain the soaked rice and add it to the simmering milk. Keep the flame on low and let the rice cook slowly in the milk. Stir frequently so the rice doesn’t clump or settle at the bottom.
This is where patience is key. It may take around 35–40 minutes for the rice to cook completely and the milk to reduce to a thick, pudding-like consistency. The rice should be soft, almost melt-in-the-mouth.
Tip: The longer you cook it, the better the flavor. Kheer tastes best when the milk is allowed to reduce naturally, without rushing.
4. Sweeten and Flavor
Once the rice is fully cooked and the milk is thick and creamy, it’s time to add the sugar. Mix well and let it dissolve completely.
Now, add your crushed cardamom pods or cardamom powder. If you soaked saffron earlier, pour that in too. The aroma at this point is just magical.
Let the kheer simmer for another 5–10 minutes so all the flavors blend beautifully.
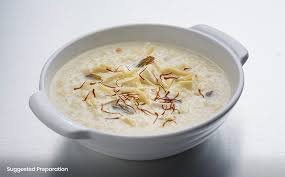
5. Add Nuts and Raisins
In a small pan, heat a tablespoon of ghee. Lightly fry the chopped nuts and raisins until the nuts turn golden and the raisins puff up. Add this fragrant mixture to the kheer and stir.
The ghee adds a lovely richness, while the fried nuts give a wonderful texture contrast to the creamy kheer.
Note: If you want a lighter version, you can skip the ghee and just add raw nuts.
6. Check the Consistency
Turn off the heat and let the kheer rest for a few minutes. As it cools, it will continue to thicken. If you feel it’s too thick, you can always add a splash of warm milk to adjust the consistency.
Some people prefer their kheer slightly runny, while others like it thick—almost like a pudding. Both versions are delicious, so go with what you love.
Serving Suggestions
You can serve kheer warm or chilled. Personally, I love it slightly warm on a rainy day, but in summer, a chilled bowl from the fridge is absolutely delightful.
If you’re serving it at a gathering, garnish with a few more saffron strands and some slivered almonds or rose petals for that extra festive touch.
Storage Tips
- Kheer can be stored in the fridge for up to 3 days in an airtight container.
- Reheat gently on low flame with a splash of milk if it thickens too much.
- Avoid freezing kheer, as the texture changes once thawed.
Variations You Can Try
Kheer is a versatile dish, and you can experiment with many variations:
- Jaggery Kheer: Replace sugar with grated jaggery for a rustic, earthy flavor. Just be sure to add it after turning off the heat, as jaggery can curdle milk if boiled.
- Vermicelli Kheer (Seviyan): Use roasted vermicelli instead of rice. It cooks faster and is often made during Eid and other festivals.
- Sabudana Kheer: Made with tapioca pearls, this version is popular during fasting days like Navratri.
- Coconut Kheer: Add coconut milk towards the end for a tropical twist.
Why We Love Kheer
What makes kheer so loved is how it brings back memories. For many of us, it reminds us of our mothers or grandmothers stirring a big pot on the stove during festivals. It’s that first spoonful offered after a prayer. It’s the sweet surprise in a tiffin box. It’s a dessert made from simple pantry staples, yet it carries the taste of tradition, of home, of love.
Final Thoughts
Making kheer isn’t just about cooking—it’s about slowing down and enjoying the process. It’s a dish that teaches patience and rewards you with warmth, flavor, and comfort in every bite.
Whether you’re making it for Diwali, Eid, a birthday, or just because you feel like something sweet, this kheer recipe is one you’ll come back to again and again.
So go ahead, gather your ingredients, put on some music, and let the magic simmer on your stovetop.